How to Setup Tailwind CSS in React and Next.js: The Ultimate Integration Guide

Software Engineer
- #tailwind css
- #react
- #nextjs
- #web development
- #frontend
- #css
Learn how to seamlessly integrate Tailwind CSS into your React and Next.js projects. This production-grade guide covers setup, optimal configurations, and modern utility-first best practices.
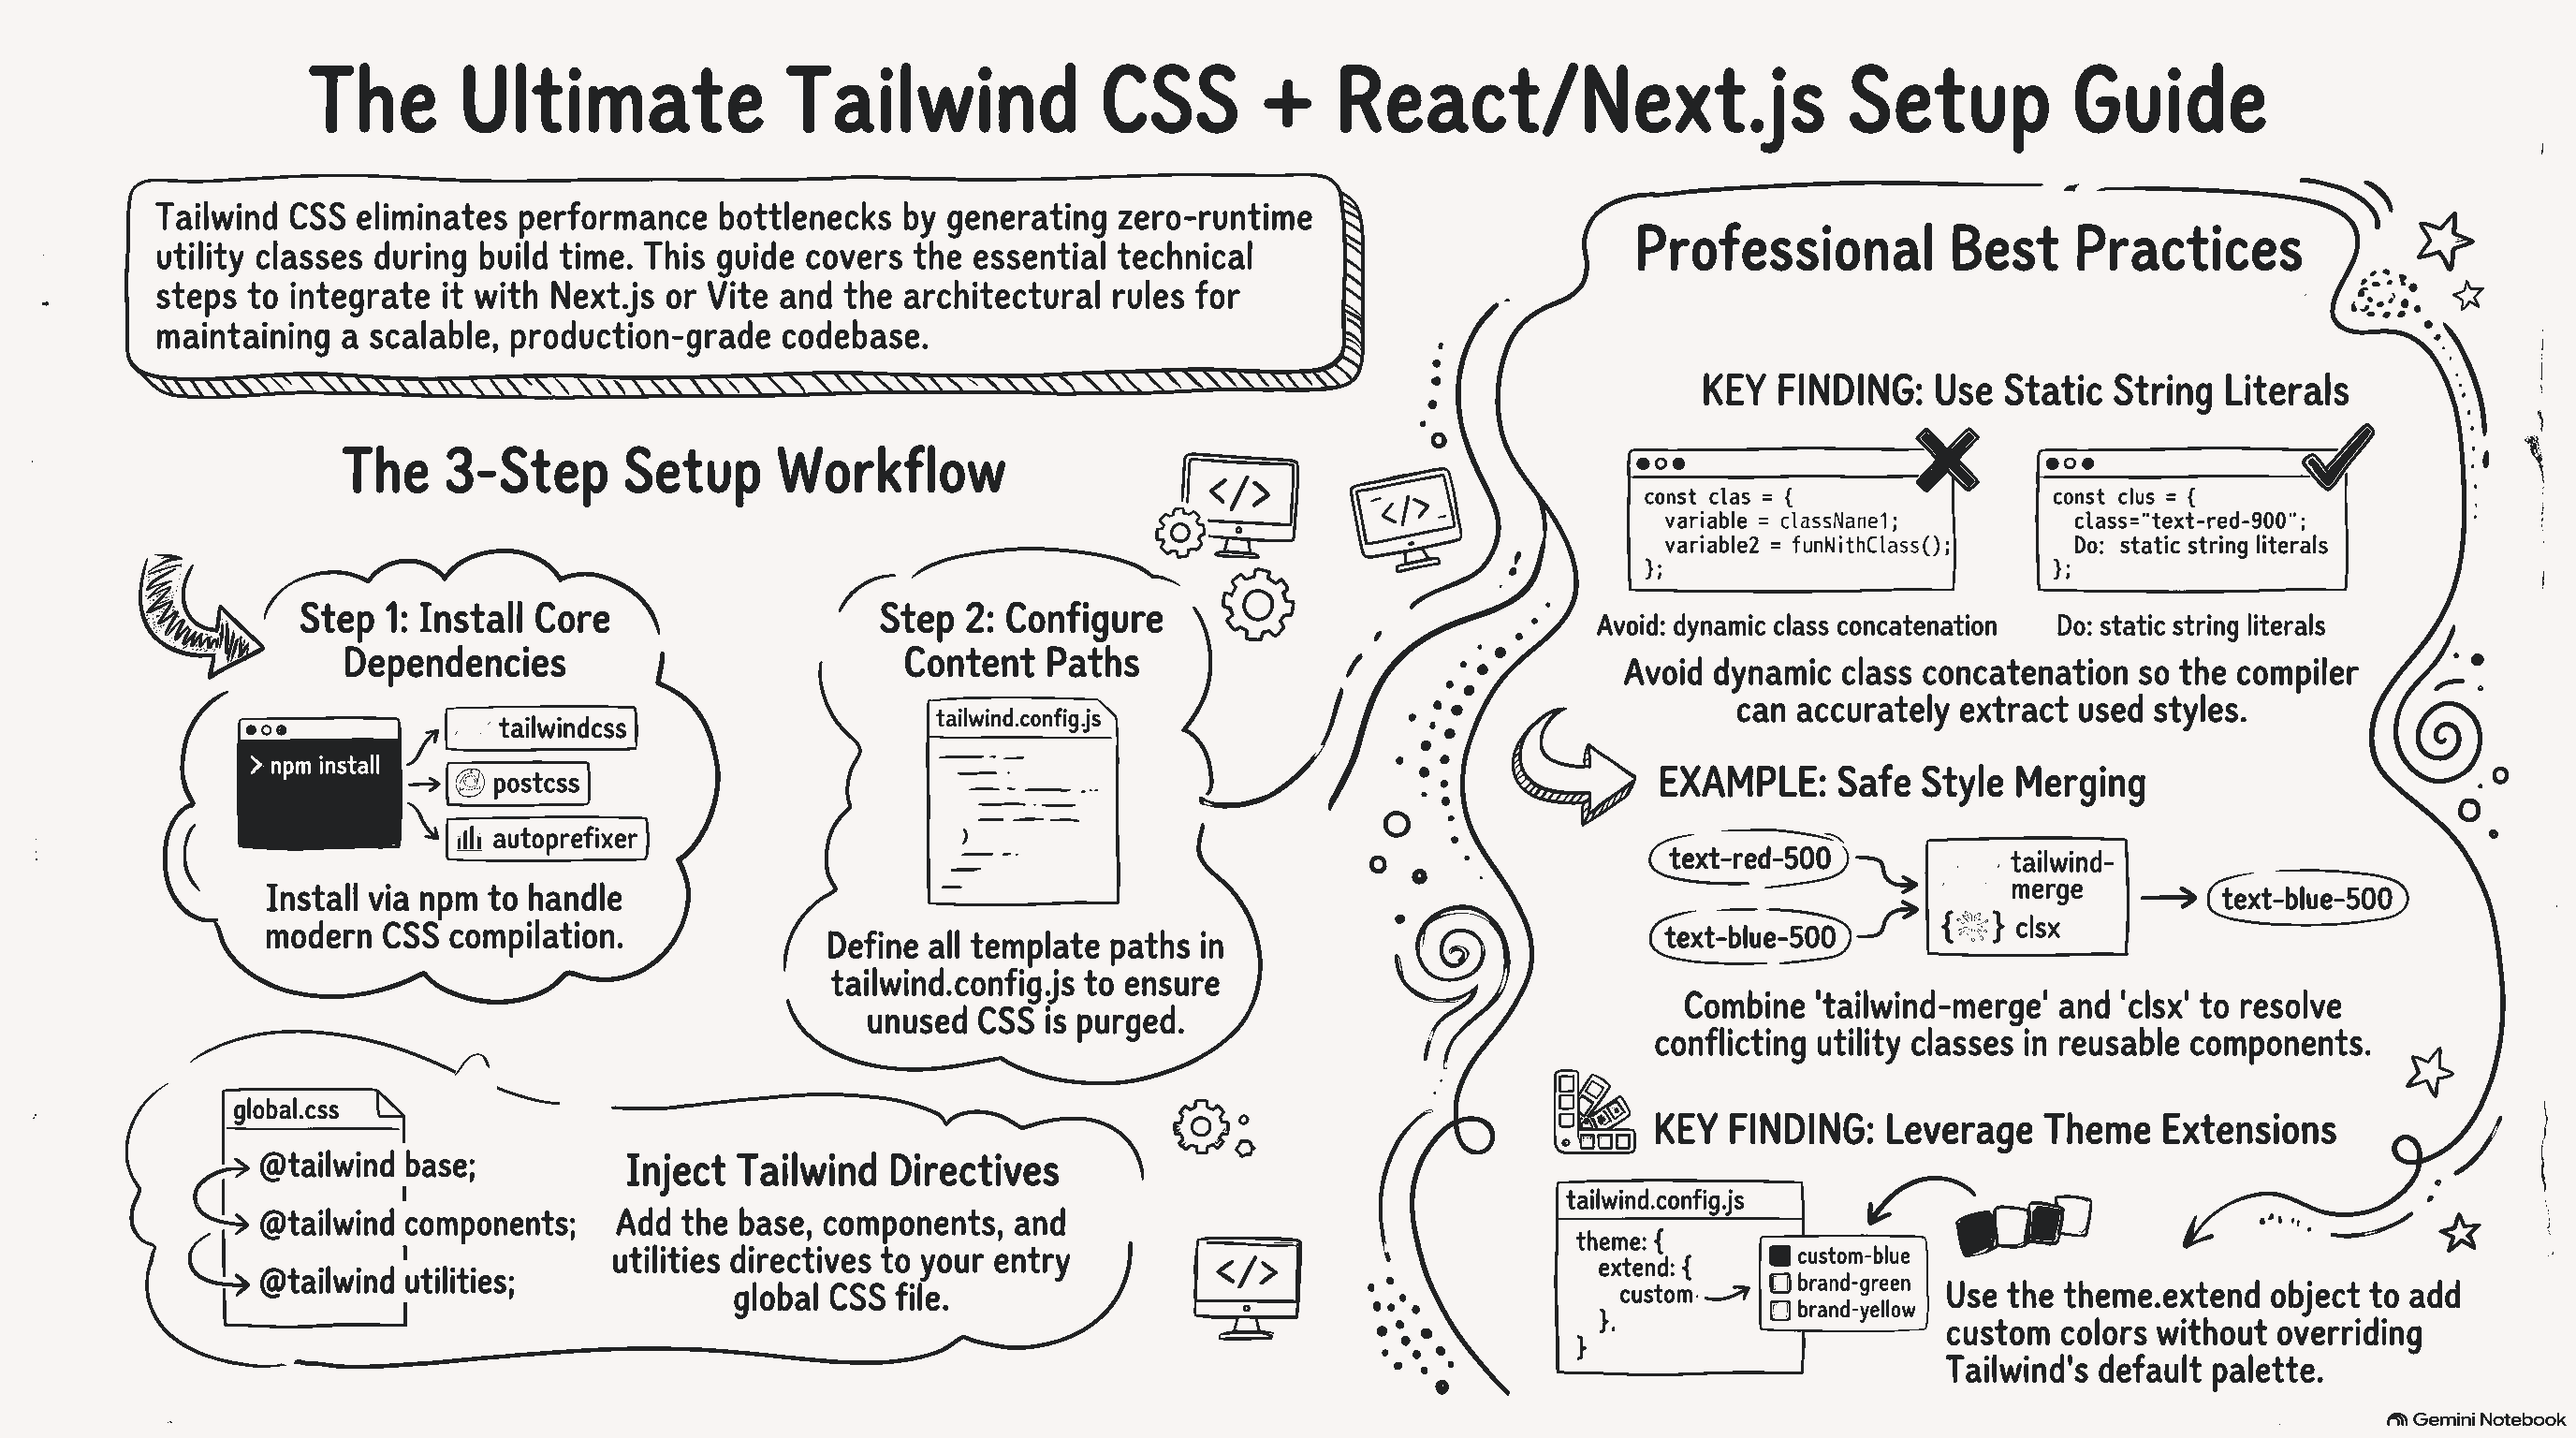
Modern frontend engineering demands speed, consistency, and exceptional performance. In the quest to build highly responsive, performant, and visually stunning user interfaces, the combination of React, Next.js, and Tailwind CSS has become the modern industry standard. As digital architectures evolve toward server-side rendering (SSR), static site generation (SSG), and incremental static regeneration (ISR), styling solutions must also evolve. Traditional CSS-in-JS libraries often suffer from performance overhead due to runtime style parsing and increased bundle sizes. Tailwind CSS, with its utility-first design and modern compiler, eliminates these performance bottlenecks by generating zero-runtime utility classes at build time.
In this comprehensive masterclass guide, we will explore how to integrate Tailwind CSS into your React and Next.js projects. We will cover step-by-step configurations, architecture variations between the App Router and Pages Router, theme customizations, build optimizations, and professional-grade best practices for clean, scalable stylesheets.
1. The Architecture: Why Combine React, Next.js, and Tailwind CSS?
To construct solid software, one must understand the relationship between the chosen tools. React utilizes a component-based model, breaking user interfaces down into autonomous, reusable pieces. Traditionally, writing CSS for these components resulted in bloated stylesheets, scoping conflicts, or the complex setups of CSS Modules.
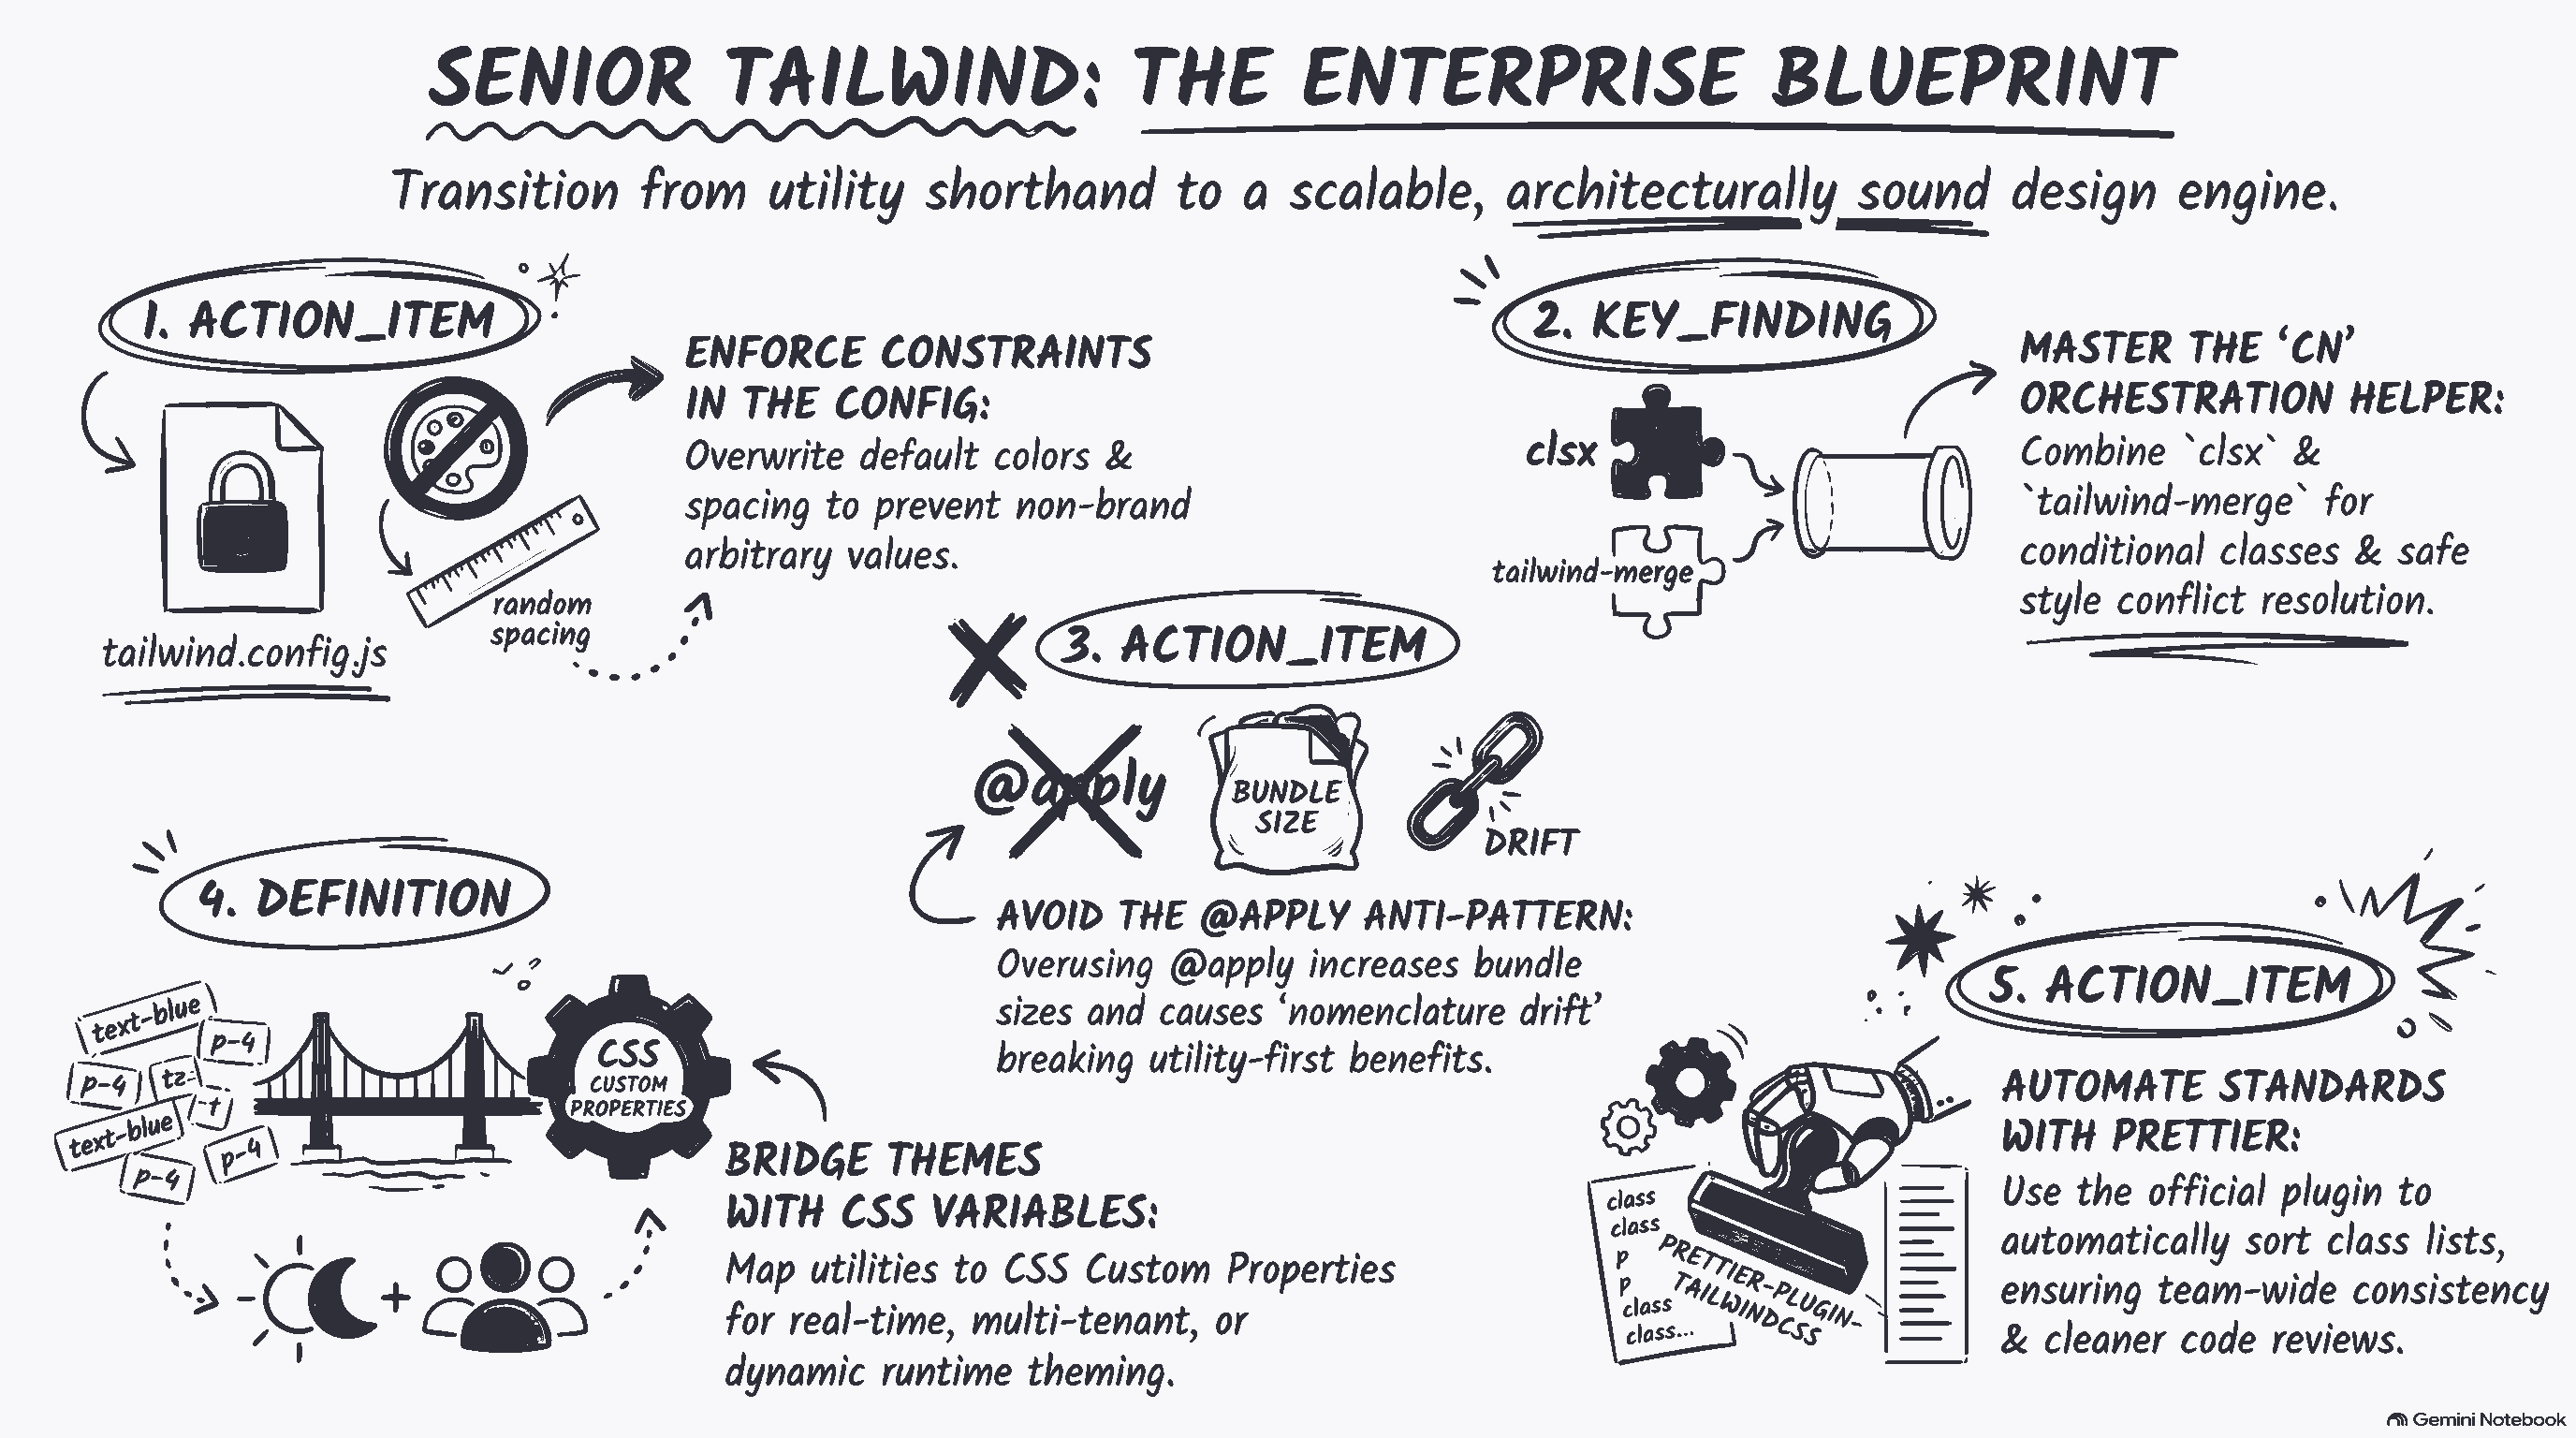
Tailwind CSS solves this paradigm mismatch through utility-first classes. Instead of writing custom CSS rules like .card { padding: 16px; border-radius: 8px; background-color: #fff; }, you apply composable utility classes directly inside your TSX/JSX: className="p-4 rounded-lg bg-white". This approach yields several architectural advantages:
Zero Runtime Overhead: Unlike style libraries that compile styles during browser execution, Tailwind parses your code during compilation and extracts only the classes you actually use. This guarantees an ultra-lightweight, production-ready static CSS bundle.
Enforced Style Guides: Tailwind uses a configuration file (
tailwind.config.js) as its single source of truth. Colors, typography, spacing, and media queries are centralized, reducing style drift across complex development teams.Enhanced Developer Velocity: Developers no longer need to jump between style modules and markup files. Styling is co-located with markup, drastically accelerating prototyping and development cycles.
Utility-first styling is not about avoiding CSS; it is about building a highly localized, consistent design system that scales seamlessly with your application.
2. Setting Up Tailwind CSS in a Next.js (App Router) Project
Next.js is the premier React framework for production applications. Setting up Tailwind CSS in a fresh or existing Next.js App Router project can be completed in a few straightforward steps.
Step 2.1: Scaffolding Your Next.js Application
If you are starting from scratch, execute the following command in your terminal to initialize a new Next.js project. The installer will prompt you with several configuration choices:
npx create-next-app@latest my-tailwind-next-appDuring the interactive prompt, ensure you select the following options to align with modern best practices:
Would you like to use TypeScript? Yes (highly recommended for production-grade type safety)
Would you like to use ESLint? Yes
Would you like to use Tailwind CSS? Yes (Selecting yes automates the installation, but if you are adding it to an existing project, see the manual setup below)
Would you like to use src/ directory? Yes
Would you like to use App Router? Yes
Step 2.2: Manual Installation of Dependencies
If you are configuring Tailwind CSS in an existing Next.js codebase, you must install Tailwind and its peer dependencies via npm, yarn, or pnpm. Execute the following command in your terminal root:
npm install -D tailwindcss postcss autoprefixer
npx tailwindcss init -p
The -p flag automatically generates both a tailwind.config.js file and a postcss.config.js file inside your root folder. This ensures PostCSS knows how to compile Tailwind CSS styles for optimal cross-browser compatibility.
Step 2.3: Configuring Content Paths
Open your newly generated tailwind.config.js file. You must specify the entry paths for all of your template files. This tells Tailwind's compiler exactly where to look for styling classes to ensure unused CSS is effectively purged in your production builds:
/** @type {import('tailwindcss').Config} */
module.exports = {
  content: [
    "./app/**/*.{js,ts,jsx,tsx,mdx}",
    "./pages/**/*.{js,ts,jsx,tsx,mdx}",
    "./components/**/*.{js,ts,jsx,tsx,mdx}",
    "./src/**/*.{js,ts,jsx,tsx,mdx}"
  ],
  theme: {
    extend: {},
  },
  plugins: [],
}
Step 2.4: Importing Tailwind Directives
In the Next.js App Router structure, the entry stylesheet is typically found at src/app/globals.css (or app/globals.css if not using a src directory). Open this file, remove any default boilerplate styles, and inject the three base Tailwind directives at the absolute top of the file:
@tailwind base;
@tailwind components;
@tailwind utilities;
With these directives imported, Next.js will automatically compile Tailwind classes throughout your entire React layout tree. You can verify the configuration by adding utility classes to your main app/page.tsx component:
export default function Page() {
  return (
    <main className="flex min-h-screen flex-col items-center justify-center bg-slate-900 text-white">
      <h1 className="text-4xl font-extrabold tracking-tight text-teal-400 sm:text-6xl">
        Tailwind CSS + Next.js
      </h1>
      <p className="mt-4 text-lg text-slate-300">
        Successfully configured with App Router!
      </p>
    </main>
  );
}
3. Setting Up Tailwind CSS in a Vite-based React Project
For applications that do not require the comprehensive server-side features of Next.js, Vite has become the build tool of choice for building lightweight, highly performant React single-page applications (SPAs). Setting up Tailwind CSS in a Vite-React environment follows a slightly different architecture.
Step 3.1: Create Your Vite React App
Execute the command below to initialize a new React project running on top of the Vite bundler:
npm create vite@latest my-react-app -- --template react-ts
cd my-react-app
npm install
Step 3.2: Add Tailwind, PostCSS, and Autoprefixer
Install the styling dependencies as development packages, and scaffold your configuration files:
npm install -D tailwindcss postcss autoprefixer
npx tailwindcss init -p
Step 3.3: Configure Vite-Specific Content Paths
Because Vite works directly with root HTML templates, make sure to add your root index.html and all React components in the src folder to the configuration content array:
/** @type {import('tailwindcss').Config} */
export default {
  content: [
    "./index.html",
    "./src/**/*.{js,ts,jsx,tsx}"
  ],
  theme: {
    extend: {},
  },
  plugins: [],
}
Step 3.4: Inject Directives inside index.css
Navigate to src/index.css in your Vite project, strip out default styles, and inject the core directives:
@tailwind base;
@tailwind components;
@tailwind utilities;
Now run your Vite development server with npm run dev to view your application compiled instantly using Hot Module Replacement (HMR).
4. Deep Dive: Customizing Your Tailwind Config File
One of Tailwind's greatest architectural features is its deep customizability. Rather than battling the framework to match your design system, you configure the style parameters directly within tailwind.config.js. Understanding the key distinction between theme and theme.extend is critical.
If you declare properties directly under the theme object, you override Tailwind’s defaults entirely. For example, if you declare theme: { colors: { blue: '#0070f3' } }, you will lose access to all standard Tailwind color shades (e.g., green, gray, red). To preserve default styling values while adding custom properties, place your rules inside theme.extend:
/** @type {import('tailwindcss').Config} */
module.exports = {
  content: ["./src/**/*.{js,ts,jsx,tsx}"],
  theme: {
    extend: {
      colors: {
        brand: {
          50: '#f0fdfa',
          500: '#14b8a6',
          900: '#115e59',
        },
      },
      fontFamily: {
        sans: ['var(--font-inter)', 'sans-serif'],
      },
      boxShadow: {
        'neon': '0 0 15px rgba(20, 184, 166, 0.5)',
      }
    },
  },
  plugins: [],
}
By defining your custom palette inside theme.extend.colors, you can reference clean semantic utilities like className="bg-brand-500 text-brand-900 shadow-neon" directly within your JSX components.
5. Architectural Best Practices & Performance Optimization
When developing large-scale React and Next.js applications, poor styling architectures can introduce maintenance bottlenecks. Follow these expert guidelines to ensure high-velocity, production-grade styling.
5.1: Avoid Dynamic Class Name Concatenation
Tailwind’s build engine relies on static extraction. It scans your files for literal strings to generate CSS classes. If you build class names dynamically, the compiler will fail to discover them at build time.
Incorrect Anti-Pattern:
// This class will not be compiled or rendered correctly in production!
const Button = ({ color }) => {
  return <button className={`bg-${color}-500 text-white`} />
}
Correct Pattern:
// Use explicit mapping so the compiler can detect string literals
const colorMap = {
  teal: 'bg-teal-500 text-white hover:bg-teal-600',
  indigo: 'bg-indigo-500 text-white hover:bg-indigo-600',
};

const Button = ({ color }) => {
  return <button className={colorMap[color]} />
}
5.2: Use tailwind-merge and clsx for Clean Component Variant Composition
When building reusable UI elements (like customized button packages), you often need to merge default utility configurations with override styles sent from top-level parent components. Direct string concatenation can cause style conflicts (e.g., merging p-4 with p-6 creates conflicting rules in pure CSS).
To resolve conflicts reliably, leverage tailwind-merge combined with the lightweight class utility clsx. Create a unified utility function to cleanly manage dynamic classes:
import { clsx } from "clsx";
import { twMerge } from "tailwind-merge";

export function cn(...inputs) {
  return twMerge(clsx(inputs));
}
Now, build highly customizable components like so:
import { cn } from "@/lib/utils";

export const Button = ({ className, ...props }) => {
  return (
    <button
      className={cn("px-4 py-2 bg-blue-600 text-white rounded hover:bg-blue-700 transition", className)}
      {...props}
    />
  );
}
6. Troubleshooting Common Pitfalls
Are your Tailwind styles failing to load correctly during your Next.js or Vite builds? Check for these common pitfalls to resolve configuration issues instantly:
Incorrect Path Configuration: If classes don't render on some pages, review the
contentarray intailwind.config.js. Ensure it includes directories where your custom pages or subcomponents live (e.g../components/**/*.{js,ts,jsx,tsx}).CSS Loading Order: Verify that your entry stylesheet containing
@tailwind base; @tailwind components; @tailwind utilities;is imported at the highest level of your file hierarchy. In Next.js App Router, this should reside inapp/layout.tsx. In Vite, verify it is imported insidesrc/main.tsx.Overriding Preflight Defaults: Tailwind sets an aggressive browser preflight to normalize default styles (removing margins, borders, and default margins on headings). If you need native browser styling within markdown or blog content, use the
@tailwindcss/typographyplugin to easily style text with theproseclass.
Conclusion: Build Scalable Web Interfaces Confidently
Setting up Tailwind CSS in a React or Next.js project yields an outstanding developer experience and lightning-fast site performance. By pairing a components-driven frontend paradigm with the utility-first agility of Tailwind, your engineering team can deliver pixel-perfect user interfaces, cut style drift, and optimize asset delivery down to the absolute bare minimum.
To deepen your styling expertise, check out the official Tailwind CSS Documentation and the interactive Next.js App Router Guide. Happy coding!